[ad_1]

|
When growing a brand new utility or integrating an current one into a brand new setting, consumer authentication and authorization require important effort to be accurately carried out. Up to now, you’ll have constructed your personal authentication system, however at present you need to use an exterior id supplier like Amazon Cognito. But, authorization logic is usually carried out in code.
This would possibly start merely sufficient, with all customers assigned a task for his or her job perform. Nonetheless, over time, these permissions develop more and more complicated. The variety of roles expands, as permissions change into extra fine-grained. New use circumstances drive the necessity for customized permissions. For example, one consumer would possibly share a doc with one other in a special function, or a assist agent would possibly require momentary entry to a buyer account to resolve a problem. Managing permissions in code is vulnerable to errors, and presents important challenges when auditing permissions and deciding who has entry to what, notably when these permissions are expressed in several functions and utilizing a number of programming languages.
At re:Invent 2022, we launched in preview Amazon Verified Permissions, a fine-grained permissions administration and authorization service on your functions that can be utilized at any scale. Amazon Verified Permissions centralizes permissions in a coverage retailer and helps builders use these permissions to authorize consumer actions inside their functions. Much like how an id supplier simplifies authentication, a coverage retailer allows you to handle authorization in a constant and scalable means.
To outline fine-grained permissions, Amazon Verified Permissions makes use of Cedar, an open-source coverage language and software program improvement package (SDK) for entry management. You may outline a schema on your authorization mannequin by way of principal sorts, useful resource sorts, and legitimate actions. On this means, when a coverage is created, it’s validated towards your authorization mannequin. You may simplify the creation of comparable insurance policies utilizing templates. Adjustments to the coverage retailer are audited with the intention to see of who made the modifications and when.
You may then join your functions to Amazon Verified Permissions by means of AWS SDKs to authorize entry requests. For every authorization request, the related insurance policies are retrieved and evaluated to find out whether or not the motion is permitted or not. You may reproduce these authorization requests to verify that permissions work as meant.
Immediately, I’m completely satisfied to share that Amazon Verified Permissions is usually obtainable with new capabilities and a simplified consumer expertise within the AWS Administration Console.
Let’s see how you need to use it in apply.
Making a Coverage Retailer with Amazon Verified Permissions
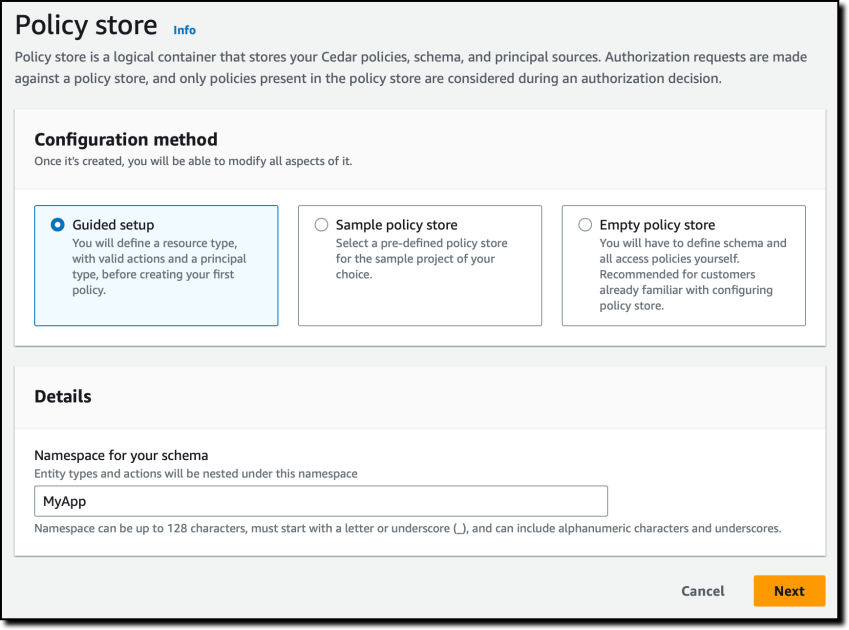
Within the Amazon Verified Permissions console, I select Create coverage retailer. A coverage retailer is a logical container that shops insurance policies and schema. Authorization selections are made primarily based on all of the insurance policies current in a coverage retailer.
To configure the brand new coverage retailer, I can use totally different strategies. I can begin with a guided setup, a pattern coverage retailer (similar to for a photo-sharing app, a web based retailer, or a activity supervisor), or an empty coverage retailer (advisable for superior customers). I choose Guided setup, enter a namespace for my schema (MyApp), and select Subsequent.

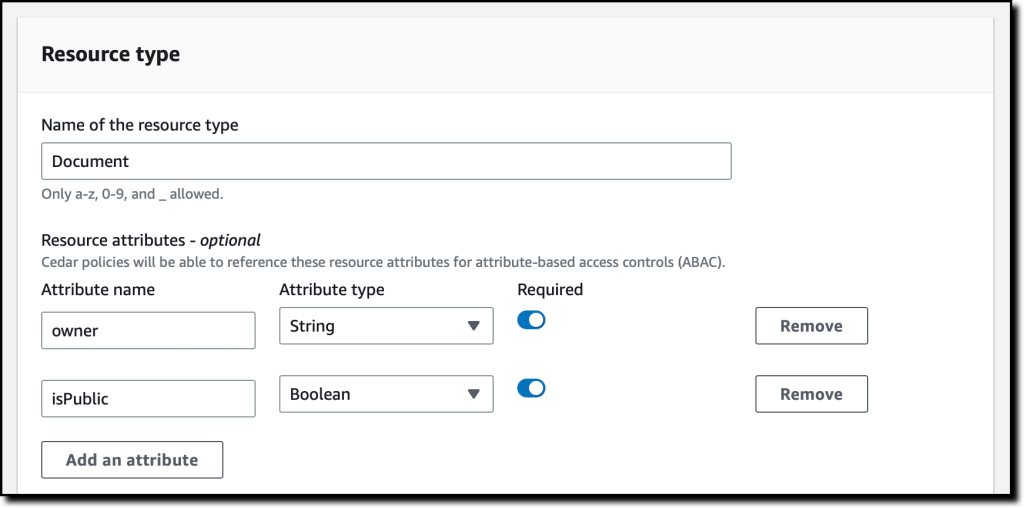
Assets are the objects that principals can act on. In my utility, I’ve Customers (principals) that may create, learn, replace, and delete Paperwork (sources). I begin to outline the Paperwork useful resource sort.
I enter the identify of the useful resource sort and add two required attributes:
proprietor(String) to specify who’s the proprietor of the doc.isPublic(Boolean) to flag public paperwork that anybody can learn.
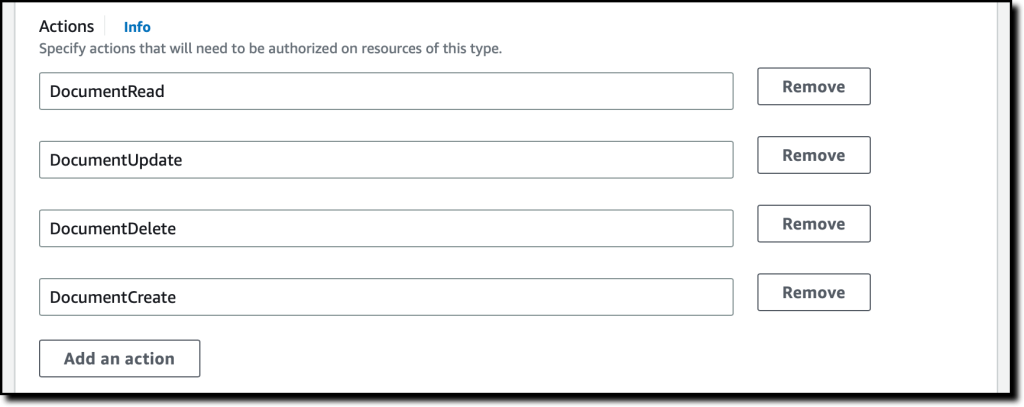
I specify 4 actions for the Doc useful resource sort:
DocumentCreateDocumentReadDocumentUpdateDocumentDelete
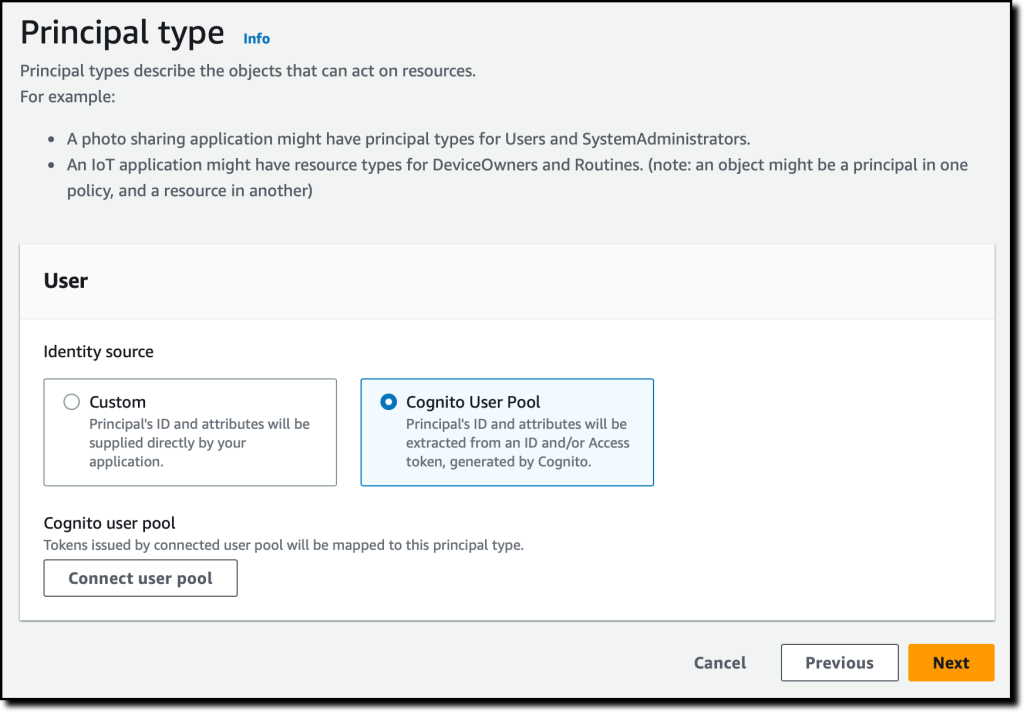
I enter Consumer because the identify of the principal sort that might be utilizing these actions on Paperwork. Then, I select Subsequent.

Now, I configure the Consumer principal sort. I can use a customized configuration to combine an exterior id supply, however on this case, I exploit an Amazon Cognito consumer pool that I created earlier than. I select Join consumer pool.
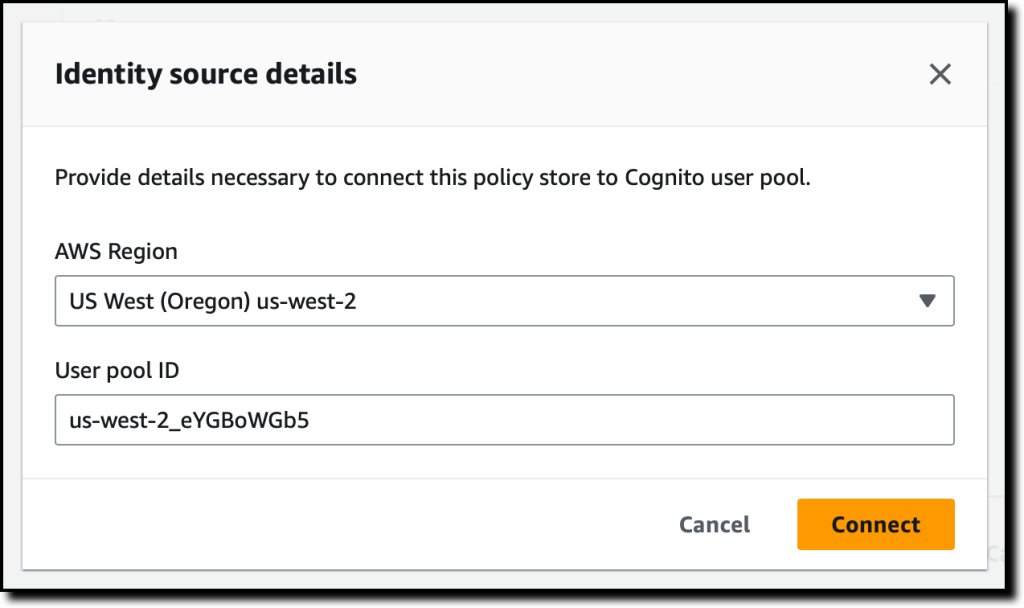
Within the dialog, I choose the AWS Area the place the consumer pool is positioned, enter the consumer pool ID, and select Join.
Now that the Amazon Cognito consumer pool is related, I can add one other stage of safety by validating the shopper utility IDs. For now, I select to not use this feature.
Within the Principal attributes part, I choose which attributes I’m planning to make use of for attribute-based entry management in my insurance policies. I choose sub (the topic), used to establish the top consumer in response to the OpenID Join specification. I can choose extra attributes. For instance, I can use email_verified in a coverage to present permissions solely to Amazon Cognito customers whose electronic mail has been verified.

As a part of the coverage retailer creation, I create a primary coverage to present learn entry to consumer danilop to the doc.txt doc.
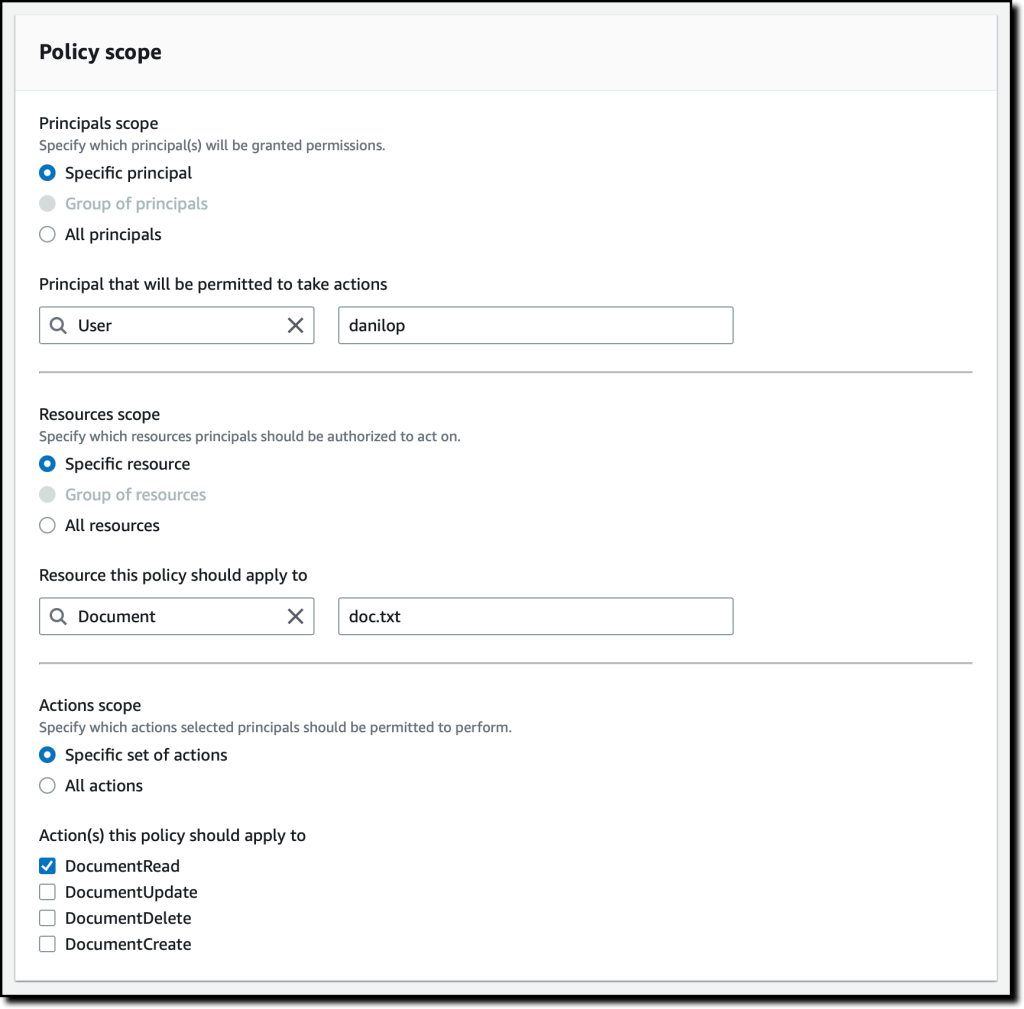
Within the following code, the console offers me a preview of the ensuing coverage utilizing the Cedar language.
Lastly, I select Create coverage retailer.
Including Permissions to the Coverage Retailer
Now that the coverage retailer has been created, I select Insurance policies within the navigation pane. Within the Create coverage dropdown, I select Create static coverage. A static coverage comprises all the data wanted for its analysis. In my second coverage, I permit any consumer to learn public paperwork. By default every little thing is forbidden, so in Coverage Impact I select Allow.
Within the Coverage scope, I depart All principals and All sources chosen, and choose the DocumentRead motion. Within the Coverage part, I alter the when situation clause to restrict permissions to sources the place isPublic is the same as true:
I enter an outline for the coverage and select Create coverage.
For my third coverage, I create one other static coverage to permit full entry to the proprietor of a doc. Once more, in Coverage Impact, I select Allow and, within the Coverage scope, I depart All principals and All sources chosen. This time, I additionally depart All actions chosen.
Within the Coverage part, I alter the when situation clause to restrict permissions to sources the place the proprietor is the same as the sub of the principal:
In my utility, I would like to permit learn entry to particular customers that aren’t house owners of a doc. To simplify that, I create a coverage template. Coverage templates let me create insurance policies from a template that makes use of placeholders for a few of their values, such because the principal or the useful resource. The placeholders in a template are key phrases that begin with the ? character.
Within the navigation pane, I select Coverage templates after which Create coverage template. I enter an outline and use the next coverage template physique. When utilizing this template, I can specify the worth for the ?principal and ?useful resource placeholders.
I full the creation of the coverage template. Now, I exploit the template to simplify the creation of insurance policies. I select Insurance policies within the navigation pane, after which Create a template-linked coverage within the Create coverage dropdown. I choose the coverage template I simply created and select Subsequent.
To provide entry to a consumer (danilop) for a particular doc (new-doc.txt), I simply cross the next values (word that MyApp is the namespace of the coverage retailer):
- For the Principal:
MyApp::Consumer::"danilop" - For the Useful resource:
MyApp::Doc::"new-doc.txt"
I full the creation of the coverage. It’s now time to check if the insurance policies work as anticipated.
Testing Insurance policies within the Console
In my functions, I can use the AWS SDKs to run an authorization request. The console gives a technique to to simulate what my functions would do. I select Check bench within the navigation pane. To simplify testing, I exploit the Visible mode. Instead, I’ve the choice to make use of the identical JSON syntax as within the SDKs.
As Principal, I cross the janedoe consumer. As Useful resource, I exploit necessities.txt. It’s not a public doc (isPublic is false) and the proprietor attribute is the same as janedoe‘s sub. For the Motion, I choose MyApp::Motion::"DocumentUpdate".
When operating an authorization request, I can cross Extra entities with extra details about principals and sources related to the request. For now, I depart this half empty.
I select Run authorization request on the high to see the choice primarily based on the present insurance policies. As anticipated, the choice is permit. Right here, I additionally see which insurance policies hav been glad by the authorization request. On this case, it’s the coverage that permits full entry to the proprietor of the doc.
I can take a look at different values. If I alter the proprietor of the doc and the motion to DocumentRead, the choice is deny. If I then set the useful resource attribute isPublic to true, the choice is permit as a result of there’s a coverage that allows all customers to learn public paperwork.
Dealing with Teams in Permissions
The executive customers in my utility want to have the ability to delete any doc. To take action, I create a task for admin customers. First, I select Schema within the navigation pane after which Edit schema. Within the listing of entity sorts, I select so as to add a brand new one. I exploit Position as Kind identify and add it. Then, I choose Consumer within the entity sorts and edit it so as to add Position as a mum or dad. I save modifications and create the next coverage:
Within the Check bench, I run an authorization request to examine if consumer jeffbarr can delete (DocumentDelete) useful resource doc.txt. As a result of he’s not the proprietor of the useful resource, the request is denied.
Now, within the Extra entities, I add the MyApp::Consumer entity with jeffbarr as identifier. As mum or dad, I add the MyApp::Position entity with admin as identifier and make sure. The console warns me that entity MyApp::Position::"admin" is referenced, but it surely isn’t included in further entities information. I select so as to add it and repair this situation.
I run an authorization request once more, and it’s now allowed as a result of, in response to the extra entities, the principal (jeffbarr) is an admin.
Utilizing Amazon Verified Permissions in Your Software
In my functions, I can run an authorization requests utilizing the isAuthorized API motion (or isAuthrizedWithToken, if the principal comes from an exterior id supply).
For instance, the next Python code makes use of the AWS SDK for Python (Boto3) to examine if a consumer has learn entry to a doc. The authorization request makes use of the coverage retailer I simply created.
import boto3
import time

verifiedpermissions_client = boto3.shopper("verifiedpermissions")

POLICY_STORE_ID = "XAFTHeCQVKkZhsQxmAYXo8"

def is_authorized_to_read(consumer, useful resource):

    authorization_result = verifiedpermissions_client.is_authorized(
        policyStoreId=POLICY_STORE_ID,
        principal="entityType": "MyApp::Consumer", "entityId": consumer,
        motion=,
        useful resource=
    )

    print('Can  learn  ?'.format(consumer, useful resource))

    determination = authorization_result["decision"]

    if determination == "ALLOW":
        print("Request allowed")
        return True
    else:
        print("Request denied")
        return False

if is_authorized_to_read('janedoe', 'doc.txt'):
    print("This is the doc...")

if is_authorized_to_read('danilop', 'doc.txt'):
    print("This is the doc...")
I run this code and, as you possibly can anticipate, the output is in step with the checks run earlier than.
Availability and Pricing
Amazon Verified Permissions is on the market at present in all business AWS Areas, excluding these which are primarily based in China.
With Amazon Verified Permissions, you solely pay for what you employ primarily based on the variety of authorization requests and API calls made to the service. For extra data, see Amazon Verified Permissions pricing.
Utilizing Amazon Verified Permissions, you possibly can configure fine-grained permissions utilizing the Cedar coverage language and simplify the code of your functions. On this means, permissions are maintained in a centralized retailer and are simpler to audit. Right here, you possibly can learn extra about how we constructed Cedar with automated reasoning and differential testing.
Handle authorization on your functions with Amazon Verified Permissions.
— Danilo
[ad_2]
Source link