[ad_1]

|
Amazon Nimble Studio is a brand new service that artistic studios can use to provide visible results, animations, and interactive content material solely within the cloud with AWS, from the storyboard sketch to the ultimate deliverable. Nimble Studio supplies clients with on-demand entry to digital workstations, elastic file storage, and render farm capability. It additionally supplies built-in automation instruments for IP safety, permissions, and collaboration.
Conventional artistic studios typically face the problem of attracting and onboarding expertise. Expertise just isn’t localized, and it’s essential to hurry up the hiring of distant artists and make them as productive as in the event that they had been in the identical bodily house. It’s additionally essential to permit distributed groups to make use of the identical workflow, software program, licenses, and instruments that they use in the present day, whereas retaining all property safe.
As well as, conventional clients resort to purchasing extra for his or her native render farms, lease at a premium, or prolong their capability with cloud assets. Those that resolve to render on the cloud navigate these choices and the massive breadth of AWS choices and understand complexity, which may lead them to decide on legacy approaches.
Right this moment, we’re comfortable to announce the launch of Amazon Nimble Studio, a service that addresses these considerations by offering ready-made IT infrastructure as a service, together with workstations, storage, and rendering.
Nimble Studio is a part of a broader portfolio of purpose-built AWS capabilities for media and leisure use circumstances, together with AWS companies, AWS and Associate Options, and over 400 AWS Companions. You’ll be able to study extra about our AWS for Media & Leisure initiative, additionally launched in the present day, which helps media and leisure clients simply establish industry-specific AWS capabilities throughout 5 key enterprise areas: Content material manufacturing, Direct-to-consumer and over-the-top (OTT) streaming, Broadcast, Media provide chain and archive, and Knowledge science and Analytics.
Advantages of utilizing Nimble Studio
Nimble Studio is constructed on prime of AWS infrastructure, guaranteeing performant computing energy and safety of your information. It additionally permits an elastic manufacturing, permitting studios to scale the artists’ workstations, storage, and rendering wants primarily based on demand.
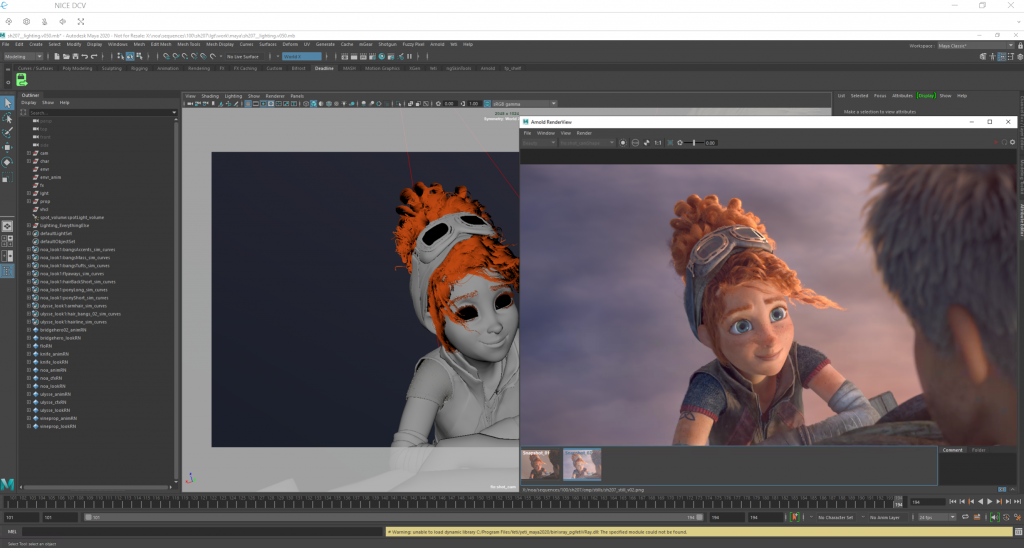
When utilizing Nimble Studio, artists can use their favourite artistic software program instruments on an Amazon Elastic Compute Cloud (EC2) digital workstation. Nimble Studio makes use of EC2 for compute, Amazon FSx for storage, AWS Single Signal-On for person administration, and AWS Thinkbox Deadline for render farm administration.
Nimble Studio is open and appropriate with most storage options that help the NFS/SMB protocol, resembling Weka.io and Qumulo, so you’ll be able to convey your personal storage.
For prime-performance distant show, the service makes use of the NICE DCV protocol and provisions G4dn cases which can be out there with NVIDIA GPUs.
By offering the flexibility to share property utilizing globally accessible information storage, Nimble Studio makes it potential for studios to onboard international expertise. And Nimble Studio centrally manages licenses for a lot of software program packages, reduces the friction of onboarding new artists, and permits predictable budgeting.
As well as, Nimble Studio comes with an artist-friendly console. Artists don’t have to have an AWS account or use the AWS Administration Console to do their work.
However my favourite factor about Nimble Studio is that it’s intuitive to arrange and use. On this publish, I’ll present you methods to create a cloud-based studio.

Arrange a cloud studio utilizing Nimble Studio
To get began with Nimble Studio, go to the AWS Administration Console and create your cloud studio. You’ll be able to resolve if you wish to convey your current assets, resembling file storage, render farm, software program license service, Amazon Machine Picture (AMI), or a listing in Lively Listing. Studios that migrate current tasks can use AWS Snowball for quick and safe bodily information migration.
Configure AWS SSO
For this configuration, select the choice the place you don’t have any current assets, so you’ll be able to see how simple it’s to get began. Step one is to configure AWS SSO in your account. You’ll use AWS SSO to assign the artists permissions primarily based on some roles to entry the studio. To arrange AWS SSO, comply with these steps within the AWS Listing Providers console.
Configure your studio with StudioBuilder
StudioBuilder is a device that may assist you to to deploy your studio just by answering some configuration questions. StudioBuilder is accessible in an AMI. You may get it free of charge from the AWS Market.
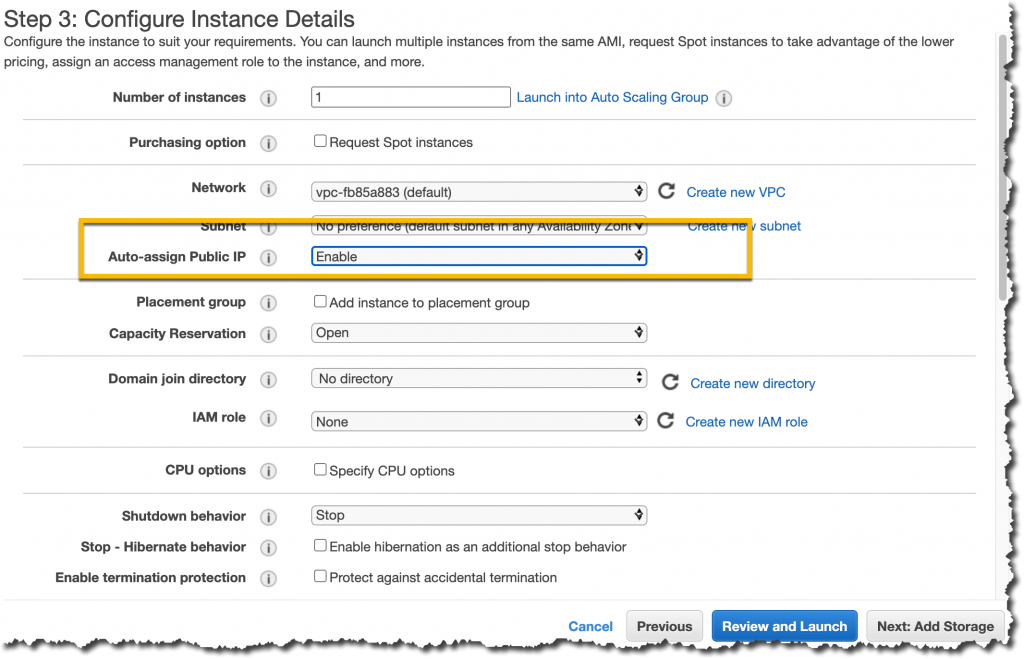
After you get the AMI from AWS Market, you could find it within the Public photos record within the EC2 console. Launch that AMI in an EC2 occasion. I like to recommend a t3.medium occasion. Set the Auto-assign Public IP subject to Allow to make sure that your occasion receives a public IP tackle. You’ll use it later to connect with the occasion.
As quickly as you connect with the occasion, you’re directed to the StudioBuilder setup.

The setup guides you, step-by-step by way of the configuration of networking, storage, Lively Listing, and rendering farm. Merely reply the inquiries to construct the precise studio to your wants.

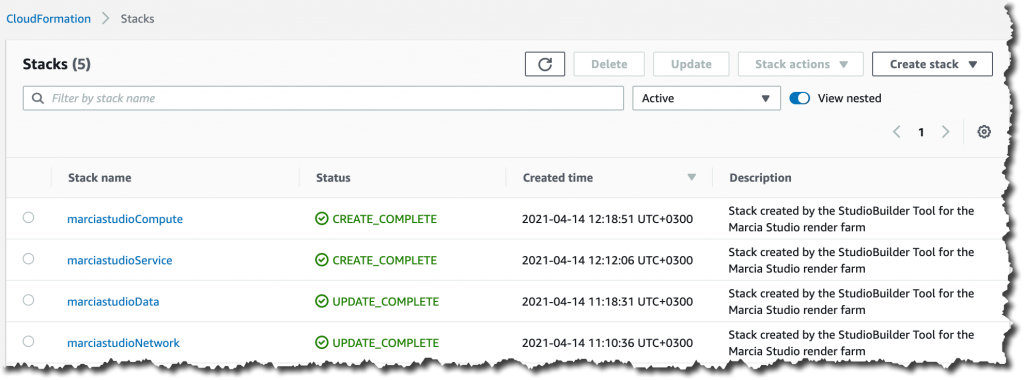
The setup takes round 90 minutes. You’ll be able to monitor the progress utilizing the AWS CloudFormation console. Your studio is prepared when 4 new CloudFormation stacks have been created in your account: Community, Knowledge, Service, and Compute.
Now terminate the StudioBuilder occasion and return to the Nimble Studio console. In Studio setup, you’ll be able to see that you just’ve accomplished 4 of the 5 steps.

Assign entry to studio admin and customers
To finish the final step, Step 5: Enable studio entry, you’ll use the Lively Listing listing you created through the StudioBuilder step and the AWS SSO you configured earlier to permit entry to the directors and artists to the studio.
Comply with the directions within the Nimble Studio console to attach the listing to AWS SSO. Then you’ll be able to add directors to your studio. Directors have management over what customers can do within the studio.
At this level, you’ll be able to add customers to the studio, however as a result of your listing doesn’t have customers but, transfer to the following step. You’ll be able to return to this step later so as to add customers to the studio.
Accessing the studio for the primary time
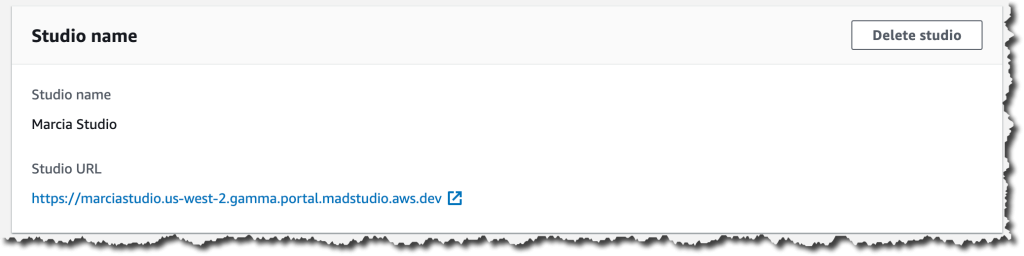
Once you open the studio for the primary time, one can find the Studio URL within the Studio Supervisor console. You’ll share this URL along with your artists when the studio is prepared. To sign up to the studio, you want the person title and password of the Admin you created earlier.
Launch profiles
When the studio opens, you will notice two launch profiles: one that could be a render farm occasion and the opposite that could be a workstation. They had been created by StudioBuilder while you arrange the studio. Launch profiles management entry to assets in your studio, resembling compute farms, shared file techniques, occasion sorts, and AMIs. You need to use the Nimble Studio console to create as many launch profiles as you want, to customise your group’s entry to the studio assets.

Once you launch a profile, you launch a workstation that features all of the software program you offered within the put in AMI. It takes a couple of minutes for the occasion to launch for the primary time. When it’s prepared, you will notice the occasion within the browser. You’ll be able to sign up to it with the identical person title and password you utilize to sign up to the studio.

Now your studio is prepared! Earlier than you share it along with your artists, you would possibly need to configure extra launch profiles, add your artist customers to the listing, and provides these customers permissions to entry the studio and launch profiles.
Right here’s a brief video that describes how Nimble Studio may also help you and works:
Obtainable now
Nimble Studio is now out there within the US West (Oregon), US East (N. Virginia), Canada (Central), Europe (London), Asia Pacific (Sydney) Areas and the US West (Los Angeles) Native Zone.
Be taught extra about Amazon Nimble Studio and get began constructing your studio within the cloud.
— Marcia
[ad_2]
Source link