[ad_1]
Infrastructure as code makes IT operations a part of the software program improvement crew, with scalable and testable infrastructure configurations. To reap the advantages, IaC instruments combine with different DevOps choices, as on this tutorial for Pulumi with Microsoft Azure DevOps.
Pulumi gives infrastructure as code provisioning, whereas Azure DevOps gives model management and a construct and launch device. Collectively, they kind a pipeline to outline, construct, check and deploy infrastructure, and to share infrastructure configurations. Observe this tutorial to develop infrastructure code in C# with Pulumi, unit check it utilizing the open supply NUnit framework, and safely ship it through the Azure DevOps ecosystem. First, get to know Pulumi.
Pulumi fundamentals and stipulations
The Pulumi strategy places infrastructure into widespread improvement programming languages, relatively than a website particular language (DSL) solely used for the device. Which means an infrastructure blueprint for a mission can use .NET Core, Python or one other supported language that matches the appliance code. HashiCorp Terraform makes use of the HashiCorp Configuration Language or JSON or YAML formatting to outline infrastructure as code. Equally, Azure Useful resource Supervisor has limitations on how a consumer can apply logic and check it.
Be aware: In July 2020, HashiCorp added the flexibility to outline infrastructure utilizing TypeScript and Python as a function in preview.
As a result of Pulumi makes use of an actual programming language for infrastructure code, the identical set of instruments can construct, check and deploy purposes and infrastructure. It has built-in instruments to help IT engineers as they develop, check and deploy infrastructure. Pulumi is designed to deploy to cloud suppliers, together with AWS and Azure.
To observe this Pulumi tutorial, get to know these phrases:
- Mission: The mission comprises the configuration code for infrastructure. It contains a yaml configuration file, and supply code for the way the infrastructure ought to deploy.
- Stack: These are the cases of the Mission. The configuration information for the Stack reside in <stack>.yaml.
This tutorial begins with considered one of Pulumi’s instance apps for constructing an internet site. To focus on the mixing with Azure DevOps, we make some modifications to the instance app repository:
- Cut up the Pulumi code and exams into separate initiatives.
- Use a compiled C#-based Pulumi Mission artifact (.dll) for infrastructure provisioning.
See the AzDOPulumiExample repository in Azure DevOps, and its ReadMe file for the modifications made to the instance app.
Azure DevOps fundamentals and stipulations
Microsoft gives Azure DevOps, however shouldn’t be tied to 1 language, platform or cloud. It consists of many DevOps orchestration companies, resembling Azure Boards to trace a software program mission and Pipelines to construct, check and share code.
This tutorial makes use of repositories and Azure Pipelines to mechanically construct, check and launch code. Azure Pipelines is a cloud service. It helps pipeline as code, as a result of the consumer can retailer the pipeline definition in model management. Inside Azure Pipelines, this tutorial depends on a pipeline, which describes all the CI/CD course of with definitions comprised of steps in jobs divided into levels.
- A stage is a number of jobs for a logical section of the CI/CD course of. Admins can create levels for construct, check and launch, for instance.
- Jobs are the items of labor that get assigned to an agent. A job is an inventory of sequential steps to carry out on an agent. The deployment job is a particular set of steps run towards the atmosphere to deploy.
- Steps are the atomic unit of labor. A step is usually a activity, script or reference to a template.
- The atmosphere is a group of assets, resembling VMs, that the deployment targets.
The IT group controls Azure Pipelines via each guide and programmatic means.
- Approvals are a method for the engineer to determine whether or not or not a stage executes.
- Triggers are numerous sorts of occasions that may provoke a pipeline execution. Some examples embrace a department push, pull request or a scheduled occasion.
- Variables are reusable values that work within the stage, jobs or steps in a pipeline definition.
- Templates allow IaC programmers to apply the DRY — do not repeat your self — coding precept. Templates can outline reusable content material, logic and parameters.
- Azure DevOps helps numerous sorts of artifacts to publish and devour various kinds of packages with Pipelines.
Arrange the mission and pipeline
To get began with the Pulumi instance on this tutorial, create a pattern Pulumi stack together with some unit exams. There’s a pattern repository with supply code for the mission referred to as WebServerStack, as seen in Determine 1. Begin by cloning this instance repository domestically.

As soon as the repository is cloned, you’ll be able to construct and check the mission domestically by utilizing dotnet construct and dotnet check instructions, respectively.
To arrange Azure DevOps, begin with an Azure DevOps group with repository and pipeline enabled. For this tutorial, I created an Azure DevOps group named dexterposh. Within the figures, you see this group referred to as AzDO, for Azure DevOps.
Below the AzDO group, create a repository named AzDOPulumiExample for the Pulumi code and exams mission. Create an Azure Useful resource Supervisor service connection to hook up with an Azure subscription.
Subsequent, create an atmosphere named dev and add guide approval in order that the engineer controls what deploys. With out guide approvals, Azure DevOps will mechanically create and deploy to the atmosphere. Environments can solely be created through the Azure DevOps portal.
Lastly, set up the Pulumi extension in your Azure DevOps group.
Combine Pulumi Mission inside Azure DevOps
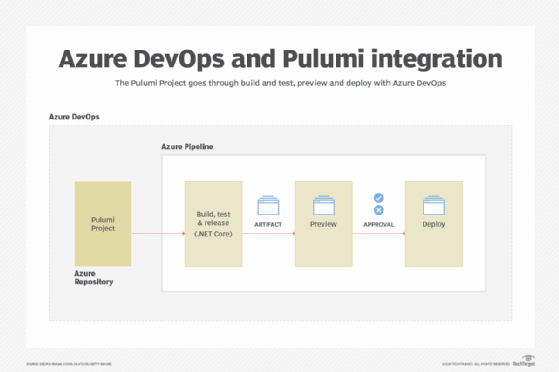
This integration with Azure DevOps permits us to make construct and launch levels for the Pulumi Mission. We will additionally lengthen the pipeline to provision modifications to the atmosphere. Phases are logical divisions meant to imitate completely different phases in an utility’s lifecycle.
Within the stage titled Construct, Take a look at & Launch, Azure DevOps will construct the mission, run exams after which bundle and publish an artifact. The Preview Stage lets the engineer or mission crew preview the modifications to the infrastructure. Lastly, within the Deploy stage, we are able to approve the modifications and make them go dwell within the atmosphere to provision infrastructure.
A high-level overview of those levels is diagrammed in Determine 2, and the ultimate integration is proven in Determine three.

Construct, Take a look at & Launch stage
In Azure DevOps, create a stage referred to as Construct, Take a look at & Launch. Add the file named azure-pipelines.yml on the root of our repository, which the AzDO group picks up by default because the pipeline definition.
Editor’s observe: Each .yaml and .yml are YAML file extensions.
On the prime of the pipeline definition in azure-pipelines.yml, we outline a number of issues.
- A pleasant title for the pipeline.
- The set off that determines how the pipeline run initiates in Azure DevOps. On this case, the set off is modifications merged to the grasp department, in addition to pull requests raised to merge to grasp.
- This tutorial makes use of the pulumi_var_group variable teams to retailer the Pulumi entry token. Additionally, we outline some variables, resembling pulumiProject and pulumiStack, used within the pipeline later.
- Phases outline a levels listing, and add a stage for Build_Test_Release.
levels:
  - stage: Build_Test_Release
    displayName: Construct, Take a look at & Launch
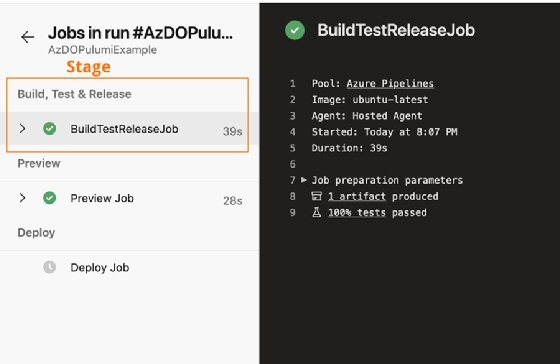
After defining a stage, execute it on an agent with a job. The job will execute all of the steps. The small print of the BuildTestReleaseJob are proven in Determine 5.
On this set of instructions, $(vmImage) refers back to the variable that we outline later within the YAML file.
levels:
  - stage: Build_Test_Release
    displayName: Construct, Take a look at & Launch
    jobs:
    - job: BuildTestReleaseJob
      pool:
        vmImage: $(vmImage)
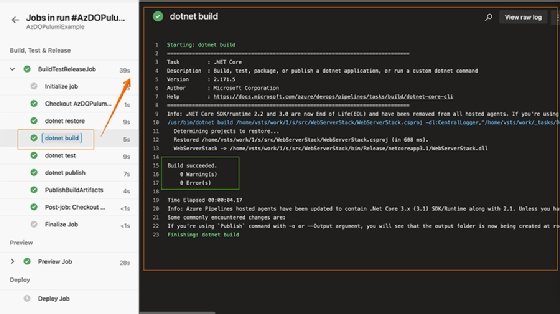
To construct a .NET app, we fetch the dependencies it references. The agent the place the code can be constructed is new and doesn’t have this data but. For all of the .NET Core-based duties right here, we use the official .NET Core CLI activity, obtainable by default. Add the duty, proven as DotNetCoreCLI@2, to revive the mission dependencies.
levels:
  - stage: Build_Test_Release
    displayName: Construct, Take a look at & Launch
    jobs:
    - job: BuildTestReleaseJob
      pool:
        vmImage: $(vmImage)
      steps:
      - activity: DotNetCoreCLI@2
        displayName: dotnet restore
        inputs:
          command: 'restore'
          initiatives: $(pulumiProject)
          feedsToUse: 'choose'
The subsequent step within the infrastructure code’s lifecycle is to construct it. The construct step ensures that the Pulumi code, together with all of the dependencies, may be compiled into the .NET framework’s Intermediate language information with a .dll extension and a binary file. The .NET Core CLI activity works right here as nicely.
      - activity: DotNetCoreCLI@2
        displayName: dotnet construct
        inputs:
          command: 'construct'
          initiatives: $(pulumiProject)
          arguments: '--nologo -c Launch'
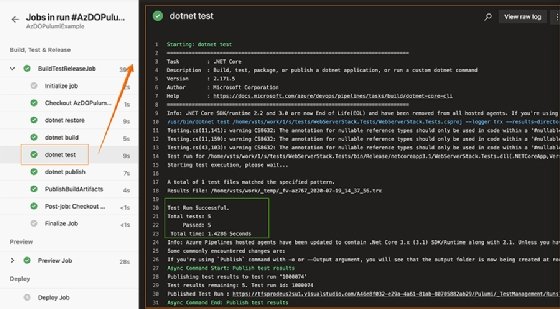
A profitable construct confirms that dependencies are pulled in efficiently, there aren’t any syntactical errors, and the .dll file was generated. Then, run exams to make sure that there aren’t any breaking modifications. Use the .NET CLI activity for this step.
- activity: DotNetCoreCLI@2
        displayName: dotnet check
        inputs:
          command: 'check'
          initiatives: $(pulumiTestProject)
          arguments: '--nologo -c Launch'

Run the duty dotnet publish towards the .NET app to generate an artifact. The artifact is what later levels will use. As soon as revealed, the .NET app and all of the dependencies can be found within the publish folder, which we are able to archive as a zipper file for later use.
Take a look at the argument specified to put the output to the $(Construct.ArtifactStagingDirectory) variable, which represents a folder path on the agent to put construct artifacts.
- activity: DotNetCoreCLI@2
        displayName: dotnet publish
        inputs:
          command: publish
          publishWebProjects: True
          arguments: '--configuration $(BuildConfiguration) --output $(Construct.ArtifactStagingDirectory)'
          zipAfterPublish: True
With the artifact prepared, archive it and publish it as a construct artifact. Azure Pipelines performs this step with the duty named PublishBuildArtifacts. Specify the variable $(Construct.ArtifactStagingDirectory) as the trail to the zip file and the revealed construct artifact is known as ‘pulumi.’
# this code takes all of the information in $(Construct.ArtifactStagingDirectory) and uploads them as an artifact of your construct.
      - activity: PublishBuildArtifacts@1
        inputs:
          pathtoPublish: '$(Construct.ArtifactStagingDirectory)'
          artifactName: 'pulumi'
On this Pipeline stage, we constructed, examined and launched the infrastructure as code from Pulumi with a number of duties beneath the BuildTestRelease job. The subsequent stage makes use of Pulumi tooling to generate a preview after which lastly deploy the mission.
Preview stage
With infrastructure code, we are able to lengthen the pipeline to generate a preview. The Preview stage is much like a Terraform execution plan, which describes the way it will get to the specified state. The Preview stage assists the engineer in reviewing the impact of modifications once they deploy to an atmosphere.
A YAML-based definition for the Preview stage, proven under, is added to the levels listing within the pipeline definition.
- stage: Preview
    jobs:
    - job: PreviewJob
      displayName: Preview Job
      pool:
        vmImage: $(vmImage)
      steps:
      - template: ./construct/downloadArtifact.yml
        parameters:
          downloadPath: $(System.ArtifactsDirectory)
          dropName: 'pulumi'
      - template: ./construct/configurePulumi.yml
        parameters:
          pulumiCwd: '$(System.ArtifactsDirectory)/pulumi'
          pulumiStack: $(pulumiStack)
          pulumiPlugin: 'azure v3.12.1'
      - activity: Pulumi@1
        displayName: pulumi preview
        inputs:
          cwd: '$(System.ArtifactsDirectory)/pulumi'
          azureSubscription: $(azServiceConnection)
          command: 'preview'
          stack: $(pulumiStack)
          createStack: true
The stage comprises a job, PreviewJob. Let’s evaluation what every step contained in the job does.
1. Template reference to construct/downloadArtifact.yml. It comprises one other two duties: to obtain the construct artifact from the earlier stage and to extract the zip file from the artifact. Right here, it downloads the pulumi named artifact and makes it obtainable within the path $(System.ArtifactsDirectory).
2. Template reference to construct/configurePulumi.yml. It comprises one other two duties: one to run the configure command and one other to put in the Azure extension to make use of with Pulumi. A plugin was added as a workaround to put in Pulumi and the Azure extension required.
Be aware: We created separate template YAML information, referred to as downloadArtifact.yml and configurePulumi.yml, to keep away from points when these steps repeat once more within the Deploy section. The configurePulumi.yml steps template was wanted as a workaround for the Pulumi activity that failed on AzureDevOps, with an error message asking to put in the Azure plugin on the agent. Pulumi shares that the error pertains to a limitation when utilizing binary mode with plugin discovery.
three. Lastly, a activity runs the Pulumi preview command to generate a preview of the modifications to be deployed to the infrastructure.

Deploy stage
The Deploy stage is the final a part of this DevOps pipeline. It makes use of the Azure DevOps atmosphere and guide approvals.
The setup defines the stage with a job and a number of steps throughout the job:
  - stage: Deploy
    jobs:
    - deployment: DeployJob
      displayName: Deploy Job
      pool:
        vmImage: $(vmImage)
      # creates an equal pulumi stack AzDO atmosphere if it does not exist
      atmosphere: $(envName)
      technique:
        # default deployment technique
        runOnce:
          deploy:
            steps:
              - template: ./construct/downloadArtifact.yml
                parameters:
                  downloadPath: $(System.ArtifactsDirectory)
                  dropName: 'pulumi'
              - template: ./construct/configurePulumi.yml
                parameters:
                  pulumiCwd: '$(System.ArtifactsDirectory)/pulumi'
                  pulumiStack: $(pulumiStack)
                  pulumiPlugin: 'azure v3.12.1'
              - activity: Pulumi@1
                displayName: pulumi replace
                situation: and(succeeded(), eq(variables['Build.SourceBranch'], 'refs/heads/grasp'))
                inputs:
                  cwd: '$(System.ArtifactsDirectory)/pulumi'
                  azureSubscription: $(azServiceConnection)
                  command: 'up'
                  stack: $(pulumiStack)
                  args: '--yes'
This stage depends on the DeployJob job. Here is what every step contained in the job does:
- Template reference to construct/downloadArtifact.yml, which is similar as defined within the Preview stage.
- Template reference to construct/configurePulumi.yml. Once more, this step is similar as defined within the Preview stage.
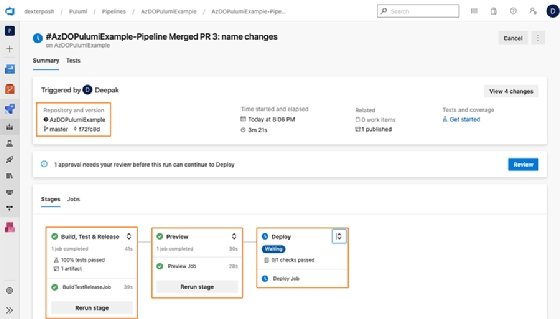
- The ultimate activity runs the command to generate a preview of the modifications to be deployed to the infrastructure. Staff members can take a look at the Preview stage to find out the impression of the change being pushed, and approve it when happy, as proven in Determine eight.
As soon as permitted, the previewed modifications are deployed, as proven in Determine 9.
After following this tutorial, DevOps groups can assess the advantages of mixing Pulumi and Azure DevOps for infrastructure as code. With a standard programming language relatively than a DSL, infrastructure code matches utility code. These programming languages are in use globally with a number of years of maturity by way of find out how to check, construct and bundle code. The mixture of Pulumi with the Azure DevOps companies creates a CI/CD pipeline for that infrastructure code. It may well additionally lengthen to alter administration, with preview capabilities and guide approvals as wanted earlier than code deploys to an atmosphere.
[ad_2]
Source link